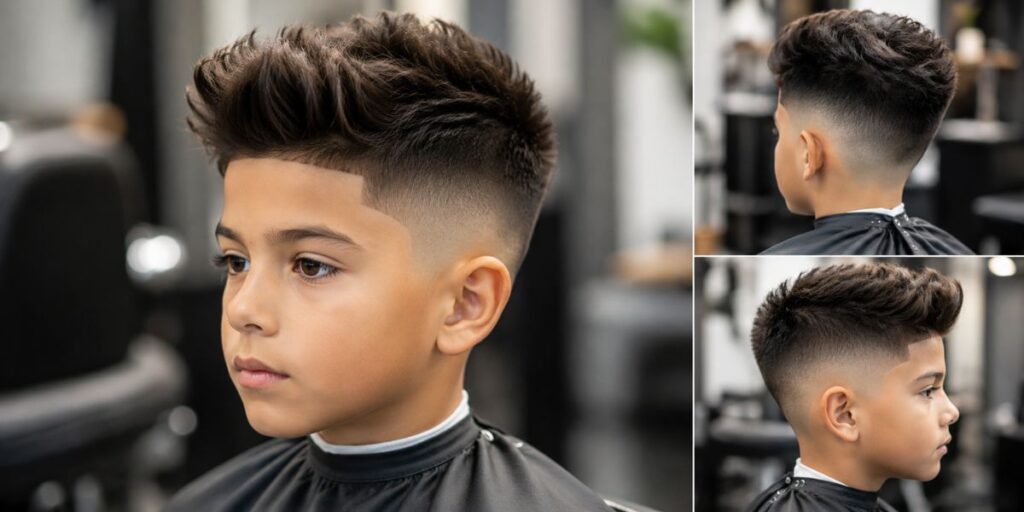
The high blowout fade has become one of the most requested cuts in modern barbershops — and for good reason. It delivers bold contrast, clean lines, and serious volume on top that works across hair types and lifestyles. Whether you’re a seasoned barber or still building your technique, mastering this cut is a career-defining skill. This guide breaks down everything you need to know: tools, step-by-step execution, styling, face shapes, variations, and the most common mistakes to avoid.
What Is a High Blowout Fade Haircut?
Defining the Blowout Fade
A blowout fade combines two core elements: a seamless clipper fade on the sides and back, paired with a voluminous, blow-dried top. The “blowout” refers to the lifted, textured finish achieved with heat and airflow — not just a clipper job. The blend must be smooth with no harsh lines, and the top should look airy and full, not stiff or flat.
Sometimes called the Brooklyn fade, this style pairs precision clipper work with heat styling to create a signature silhouette: tight on the sides, bold and lifted on top.
Why the “High” Version Stands Out
The high version starts the fade near the temples — significantly higher than a mid or low fade. This placement creates dramatic contrast between the skin-close sides and the voluminous crown. The result is a bold, structured look that suits both streetwear and formal settings. It reads strong on camera, which is part of why it’s so popular on social media and in barbershop reels.
| Fade Type | Start Point | Contrast Level | Best For |
| Low Fade | Near ears/neckline | Subtle | Conservative, office looks |
| Mid Fade | Between ear and temple | Moderate | Everyday versatility |
| High Fade | Near temples | Bold/Dramatic | Statement styles, curly hair |
Tools Every Barber Needs for a Blowout Fade
Clippers, Guards, and Styling Products
Getting the right result starts with the right kit. Here’s what you need on your station:
Clippers & Cutting Tools:
- Adjustable clipper with sharp, crisp blades
- Guards: 0, 0.5, 1, 1.5, and half steps
- Foil shaver for skin-close finishing
- Barber shears for scissor-over-comb blending
Styling Tools:
- Blow dryer with concentrator nozzle
- Vent brush for lifting roots
- Round brush for directing volume
Pre-Styling Products:
- Volumizing mousse or pre-styler
- Lightweight texture paste or matte clay
- Heat protectant spray
Preparation Before the Cut
Preparation is where great cuts begin. Follow this pre-cut checklist:
- Consult with the client — discuss fade height, top length, and desired finish
- Shampoo and rough-dry hair to about 70% dry
- Pre-section the top to keep guideline work honest
- Check clipper battery and blade sharpness before starting
- Stock all products within reach before the client sits down
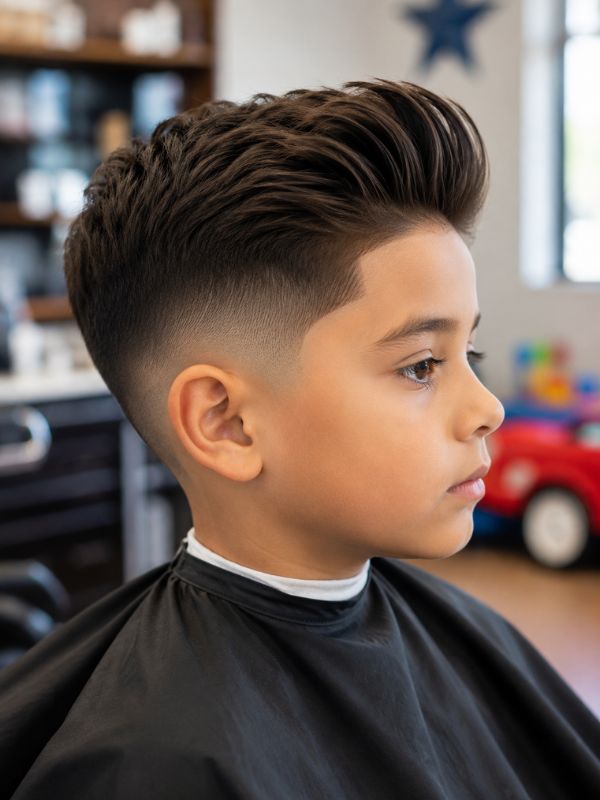
Step-by-Step Guide to Creating a High Blowout Fade
Sectioning and Initial Fade Work
Start with a clean horseshoe parting above the ridge. This separates the top from the sides and sets your working boundary. Then:
- Set your first guideline high at the temple band with the lever open
- Work in compact upward panels using guards 0, 0.5, and 1
- Erase marks between guard steps — no visible jumps allowed
- Mirror the guideline on both sides for symmetry
Keep movements tight and controlled. Rushing this stage is the biggest reason blends fail.
Blending and Tapering the Sides
Once the initial fade is set, refine the blend:
- Use a half guard to feather the transition between lengths
- Work in upward scooping motions to diffuse lines
- Check the blend under direct light — any line you see, the client will see
- Use scissor-over-comb near the ridge to remove bulk without losing shape
The goal: the fade should visually disappear as it moves up the head. No steps, no chunks, no visible guideline shadows.
Perfecting the Volume on Top
This is what separates a blowout fade from a regular high fade. The top is styled, not just cut.
- Protect the top section during all clipper work
- Apply a volumizing pre-styler to damp hair
- Blow-dry with a vent brush, lifting at the roots and directing airflow forward or upward
- Keep a subtle shelf at the ridge — strong enough to read, subtle enough to blend
- Finish with a round brush to refine the direction and add movement
The top should look light and airy. If it looks puffy or flat, adjust your brush angle and airflow direction.
Styling the High Blowout Fade After the Cut
Best Products for Hold and Volume
| Product Type | Best For | Hold Level |
| Volumizing mousse | Fine to medium hair | Light |
| Matte texture paste | Thick or coarse hair | Medium |
| Texture clay | All types, natural finish | Medium-strong |
| Light pomade | Straight hair, shine finish | Medium |
| Curl cream | Curly or wavy hair | Light-medium |
Avoid heavy gels and thick waxes — they flatten the volume and destroy the blowout’s lift.
Quick Styling Tips for Clients
Give every client a simple at-home routine before they leave the chair:
- Apply a small amount of mousse or paste to damp hair
- Use a blow dryer on medium heat, lifting at the roots with a vent brush
- Finish with a light texture product and shape with fingers
- Reset the style the next morning with a water mist and a quick blow-dry
Face Shapes That Suit a High Blowout Fade
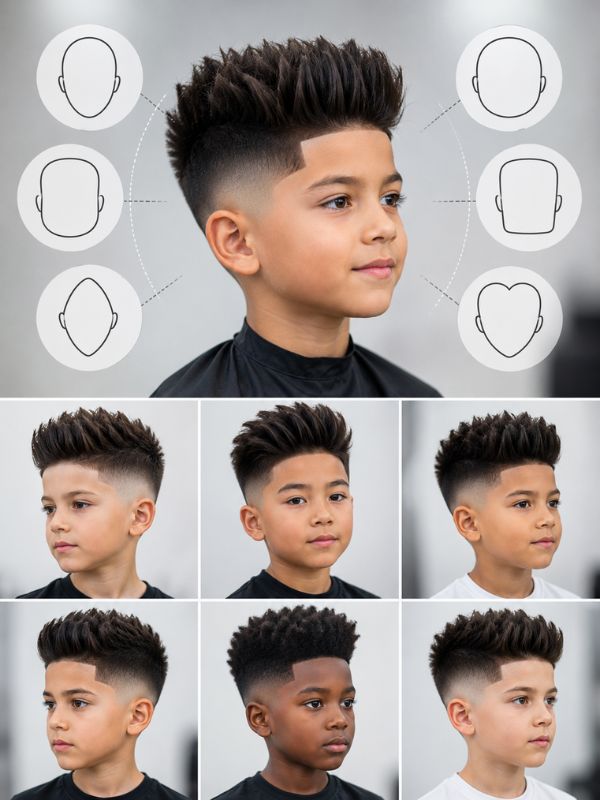
Round, Oval, and Square Faces
- Round faces benefit most from this cut. The added height creates vertical lines that slim the width and elongate the face.
- Oval faces can carry almost any fade height well — this is the most flexible face shape for blowout fades.
- Square faces work well with a high fade when paired with texture on top rather than rigid, directional styling. Softening the corners with a gradual fade helps.
Who Should Avoid This Cut
Not every client is an ideal candidate for the high blowout fade:
- Long face shapes should avoid too much added height, which further elongates the face. A mid or low fade is a better fit.
- Clients with significant thinning or recession may struggle to achieve the volume the cut relies on. In these cases, a textured crop or quiff offers a modern alternative without forcing height where density is limited.
- Very fine hair needs strategic product use to pull off the blowout — always manage expectations during the consultation.
Variations of the High Blowout Fade
High Blowout With Beard
Pairing the high blowout fade with a beard grounds the bold top and creates a cohesive masculine profile. For clean execution:
- Line the cheek curve to echo the temple band
- Taper the mustache for a clean lip line
- Keep the neck fade soft so it blurs naturally into the beard
- Adjust fade height to connect seamlessly with facial hair density
This combination looks sharp in suits, hoodies, and everything in between.
Curly Hair Blowout Fade
Curly hair is actually ideal for this cut. Natural texture creates lift without much product, and the fade amplifies the curl’s visual pop against tighter sides. Technique adjustments for curly clients:
- Dry curls with low heat and high airflow
- Scrunch in a curl cream after drying
- Set with a light gel, not a heavy one
- Avoid oils that collapse natural lift
- A quick morning water mist resets the shape daily
Modern vs Classic Blowout
| Style | Finish | Product | Direction |
| Modern Blowout | Matte, textured, broken | Paste or clay | Forward or tousled |
| Classic Blowout | Glossy, defined | Pomade | Swept back or side-parted |
Both read clean on camera. The modern version suits streetwear and casual grooming; the classic suits formal occasions and polished looks.
Common Mistakes Barbers Make With Blowout Fades
Uneven Blending
The most common complaint. Uneven blending usually comes from inconsistent guard steps or rushing through panel work. Fix it by:
- Always checking the blend under direct bright light
- Using half-guard steps to smooth transitions
- Taking smaller, more controlled passes rather than wide sweeps
If you see a line, work it out before moving on — blending lines don’t disappear on their own.
Over-Using Clippers
Some barbers rely entirely on clippers and skip scissor work entirely. This leads to a harsh, choppy finish near the ridge and flat volume on top. The blowout fade requires scissor-over-comb to manage bulk near the transition zone and proper brush styling to achieve the lifted finish. Clippers set the foundation — the dryer and brush complete the cut.
Maintenance Tips for Clients
How Often to Get a Touch-Up
| Hair Growth Rate | Recommended Touch-Up |
| Fast grower | Every 2–3 weeks |
| Average | Every 3–4 weeks |
| Slow grower | Every 4–5 weeks |
A high fade loses its sharpness faster than a low or mid fade because the transition zone is more visible. Coach clients to book earlier rather than later.
Recommended Home Care Routine
- Daily: Light product for hold and shape; no heavy buildup
- Every 2–3 days: Gentle shampoo to avoid product buildup flattening the blowout
- Weekly: Deep conditioning treatment to keep the top healthy and manageable
- Between cuts: Edge-up the hairline at home with a trimmer if comfortable, or book a lineup between full cuts
Why the High Blowout Fade Is Trending
Influence from Celebrities and Pop Culture
The high blowout fade has been worn by athletes, musicians, and actors across social media for years. Its clean, camera-ready finish makes it a natural fit for content creators and anyone building a personal brand online. The silhouette photographs well, holds shape between cuts, and translates across different cultural aesthetics — from hip-hop to European fashion.
Barbershop reel culture has also played a huge role. A clean blowout fade with good contrast photographs exceptionally well, making it a go-to for barbers building their portfolios on Instagram and TikTok.
Why Clients Keep Asking for It
The high blowout fade ticks every box for today’s client:
- Versatile — works with suits, streetwear, and gym fits
- Low styling time — a few minutes with a dryer and paste
- Face-enhancing — adds height and sharpens the jawline and cheekbones
- Works on most hair types — straight, wavy, curly, and Afro-textured
- Holds between visits — looks good for 3–4 weeks with proper home care
It’s a high-impact cut that doesn’t demand a complicated daily routine. That combination is hard to beat.
Final Thoughts for Barbers Mastering the Blowout Fade
The high blowout fade is more than a trending cut — it’s a technical benchmark. Nailing it requires clipper precision, blend control, and styling skill that goes beyond what most basic fades demand. Barbers who master it earn repeat clients, strong social content, and a reputation for versatility.
Start with solid consultation habits. Understand face shape, hair texture, and lifestyle before touching your clippers. Execute the fade in careful passes, check your work under bright light, and finish the cut with the dryer — not just scissors. That final styling step is what makes a blowout fade a blowout fade.
Practice the blend until it disappears. Build your styling instincts cut by cut. The clients who ask for this look once will keep coming back when you get it right.